Docs
Installation
Dependencies
In order to use the edamame command line interface or graphical user interface tools, a user must first create an AWS Account and install the following dependencies:
- AWS Command Line Interface: command line tool for managing AWS services.
- kubectl: command line tool for working with Kubernetes clusters (ensure you have verson 1.14 or greater which supports Kustomization files).
- eksctl: command line tool for working with EKS clusters.
- Make: a build automation tool used to build executable programs and libraries from source code.
- Go: the programming language used by K6.
- Helm: a package manager for Kubernetes.
Subsequently, a user must ensure that the AWS Command Line Interface is configured locally. This can be achieved by executing aws configure from the command line and passing in the following necessary credentials:
- AWS Access Key ID
- AWS Secret Access Key
- Default region
For more details on deriving the above credentials, please see the official docs.
Final Installation Steps
Once all the dependencies from the prior section have been installed, a user should execute the final installation steps:
- Clone the
edamamegithub repository:git clone git@github.com:edamame-load-test/edamame.git - Navigate to the root directory, and execute the commands:
npm installnpm link
CLI
edamame init
Before conducting any load tests with Edamame, a user must first create and configure the necessary AWS infrastructure by executing the command edamame init. If a user wants to specify certain availability zones to use within their cluster instead of all of the default zones within their configured AWS region, they can pass a list of desired zones to the command using the --zones flag like so: edamame init --zones us-west-2a,us-west-2b. The most time-consuming part of this process is the provisioning of an EKS Cluster, which can take up to approximately 20 minutes. The terminal will provide status updates to the user throughout this installation and configuration process.
Note: Edamame init provisions AWS infrastructure on a user's AWS account.
Terminal Output:
[09:15:51:909] ℹ Creating Edamame cluster... (this may take up to 20 minutes)
[09:34:27:582] ✔ Successfully created Edamame cluster.
[09:34:27:583] ℹ Configuring EBS credentials...
[09:35:14:030] ✔ Successfully configured EBS credentials.
[09:35:14:030] ℹ Setting up AWS Load Balancer Controller...
[09:36:16:613] ✔ Set up AWS Load Balancer Controller.
[09:36:17:446] ℹ Deploying Grafana, Postgres, & K6 Operator...
[09:36:49:854] ✔ Cluster configured. Welcome to Edamame!
edamame grafana --start
To establish secure local access to the Grafana dashboard, which allows a user to visualize and analyze the results of their load tests, execute the command edamame grafana --start. This command is usually run before conducting any load tests, so that a user can update their Grafana username and password login credentials (which by default are admin and admin), create a custom dashboard for viewing specific data that will be emitted during a load test, or navigate to the default HTTP and WebSockets data dashboard, and see all load test data arrive in near real-time.
Terminal Output:
[12:00:32:022] ℹ Configuring local access to grafana dashboard...
[12:01:02:671] ✔ Please find your Grafana dashboard at: http://localhost:3000
edamame run
Before starting a load test, a user must first write a k6 test script that defines the number of virtual users to be simulated and their behavior. Subsequently, a user can begin a load test by executing the command edamame run and providing the relative path to the k6 test script, and optionally the desired name and desired number of virtual users per pod. If a name is not provided, a unique identifier will be generated and assigned to the test. Additionally, if a specific number of virtual users per pod isn't defined, the default configuration of 20,000 virtual users per pod will be used.
To minimize a user's AWS infrastructure costs, Edamame only initializes and maintains load generating resources while a test is being executed. Before a test can run, Edamame needs to initialize these load generator resources, which can take a moment. The terminal will provide status updates to the user and inform them when the test starts. The terminal will also subsequently notify the user when a test has completed and when all the load generating resources are removed.
Full Command with Arguments:
edamame run --file {/path/to/test.js} --name "{desired name}" --vus-per-pod <num_vus>
Terminal Output:
[07:24:33:021] ℹ Initializing load test...
[07:24:33:027] ✔ Successfully initialized load test.
[07:24:33:027] ℹ Provisioning load test resources (2 generators)...
[07:25:11:079] ✔ Successfully provisioned load test resources.
[07:25:11:080] ℹ Running load test...
[07:28:12:527] ✔ Load test completed.
[07:28:12:527] ℹ Tearing down load generating resources.
[07:28:48:630] ✔ Successfully removed load generating resources from cluster.
edamame stop
While analyzing the results of a load test in the Grafana dashboard, a user may decide that their system's performance has degraded to a point where they would like to end the current test. A user can stop an actively running test by executing edamame stop.
Terminal Output:
[01:05:48:074] ℹ Stopping current test...
[01:05:53:080] ✔ Stopped current test.
edamame grafana --stop
When a user is done analyzing the results of the load test in Grafana, they can end their secure Grafana local access by executing the command edamame grafana --stop. This command will free up port 3000 for other processes to run on it.
Terminal Output:
[12:07:38:477] ℹ Stopping grafana
[12:07:38:774] ✔ Grafana dashboard has been removed
edamame update
A user can update the current name of a test by executing edamame update and providing the current name and desired new name.
Full Command with Arguments:
edamame update --current "{current test name}" --new "{new proposed name}"
Terminal Output:
[05:46:40:660] ℹ Updating test name from 'example' to '50k VUs'...
[05:46:41:442] ✔ Successfully updated test's name to: '50k VUs'
edamame get --all
A user can view information about existing load tests by executing the command edamame get --all.
Terminal Output:
[07:27:37:430] ℹ Retrieving information about historical tests...
[07:27:39:705] ✔ Successfully retrieved historical test data. Test names are listed under (index).
┌─────────────────┬────────────────────────────┬────────────────────────────┬─────────────┐
│     (index)     │         start time         │          end time          │   status    │
├─────────────────┼────────────────────────────┼────────────────────────────┼─────────────┤
│     example     │ '2023-03-20T23:20:03.744Z' │            null            │  'running'  │
│     50K VUs     │ '2023-03-20T22:52:48.864Z' │ '2023-03-20T22:55:04.873Z' │ 'completed' │
└─────────────────┴────────────────────────────┴────────────────────────────┴─────────────┘
edamame get --name
A user can view details about an individual test, including the test script contents, by executing edamame get --name and providing the test name.
Full Command:
edamame get --name "{test name}"
Terminal Output:
[06:33:08:621] ℹ Retrieving details about the test named: 'example'...
[06:33:09:554] ✔ Successfully retrieved data about the test named: 'example.'
┌─────────┬────────────────────────────┬────────────────────────────┬─────────────┐
│ (index) │         start time         │          end time          │   status    │
├─────────┼────────────────────────────┼────────────────────────────┼─────────────┤
│ example │ '2023-03-20T22:52:48.864Z' │ '2023-03-20T22:55:04.873Z' │ 'completed' │
└─────────┴────────────────────────────┴────────────────────────────┴─────────────┘
                               Test script content:
-----------------------------------------------------------------------------------
"import http from ''k6/http'';
import { check } from ''k6'';

export const options = {
  scenarios: {
    shared_iter_scenario: {
      executor: \"shared-iterations\",
      vus: 10,
      iterations: 100,
      startTime: \"0s\",
    },
    per_vu_scenario: {
      executor: \"per-vu-iterations\",
      vus: 20,
      iterations: 10,
      startTime: \"10s\",
    },
  },
};

export default function () {
  const result = http.get(''https://test-api.k6.io/public/crocodiles/'');
  check(result, {
    ''http response status code is 200'': result.status === 200,
  });
}
"
edamame delete
A user can delete a load test and all of its associated data from the database by executing edamame delete and providing the test name.
Warning: This action is permanent. There is no way to recover any of the deleted data.
Full Command:
edamame delete "{test name}"
Terminal Output:
[05:53:20:170] ℹ Deleting the test named: '40k VUs'...
[05:53:20:548] ✔ Deleted the test named: '40k VUs'...
edamame archive
If a user wants or needs to temporarily teardown their Edamame cluster, they can persist all their historical load test data beyond the life of their AWS EKS Cluster by executing edamame archive --all prior to executing edamame teardown. This command uploads data associated with each individual test as compressed file objects with the Standard storage class into an AWS S3 Bucket. If a user wants to archive only the data associated with one historical test, then they can execute edamame archive --name testName and replace testName with the name of the test that they would like to archive. Optionally, a user can execute this command with the --storage flag, passing in one of the valid storage class options:
- STANDARD (Standard)
- REDUCED_REDUNDANCY (Reduced Redundancy)
- STANDARD_IA (Standard Infrequent Access)
- ONEZONE_IA (One Zone Infrequent Access)
- INTELLIGENT_TIERING (Standard Intelligent-Tiering)
- GLACIER (Glacier Flexible Retrieval)
- DEEP_ARCHIVE (Glacier Deep Archive)
- GLACIER_IR (Glacier Instant Retrieval)
The available storage options have different associated fees & availability SLAs. Some of the classes also have retrieval charges and minimum storage duration charges. A user can read more about the options below in order to select the right class for their storage needs.
- https://aws.amazon.com/s3/storage-classes/
- https://docs.aws.amazon.com/AmazonS3/latest/userguide/storage-class-intro.html
Example:
edamame archive --name "100K VUs"
Terminal Output:
[04:08:56:294] ℹ Starting archive process...
[04:08:56:297] ℹ No S3 storage class has been specified, so the default STANDARD S3 storage class will be used.
[04:08:56:544] ℹ Creating load test AWS S3 Bucket located in: aws-region=us-west-2
 if it doesn't exist yet...
[04:09:01:715] ℹ AWS S3 Bucket is ready for uploads.
[04:09:03:366] ℹ Successfully archived 100K VUs.
[04:09:03:366] ✔ Archive process complete.
edamame delete-from-archive
If a user decides they no longer need the data associated with all or one of their historical load tests that currently exists as an object in their AWS S3 Bucket, then they can execute edamame delete-from-archive --all or edamame delete-from-archive --name testName to delete all the load test data stored in AWS S3 or the data associated with one historical load test.
Example:
edamame delete-from-archive --name "100K VUs"
Terminal Output:
[04:17:18:812] ℹ Starting archival deletion process...
[04:17:21:787] ✔ Successfully deleted 100K VUs from your Edamame load test AWS S3 Bucket.
edamame archive-contents
A user can examine what test(s) they've already archived into their AWS S3 bucket by executing edamame archive-contents.
Terminal Output:
[11:59:14:955] ℹ Loading AWS S3 Bucket archive details...
[11:59:17:351] ✔ Your Edamame load test AWS S3 Bucket contains the following load test S3 objects:
 > 100kVUs.tar.gz
edamame import-from-archive
If a user initializes a new Edamame cluster and wants to import historical load test data that they previously archived into AWS S3, they can execute edamame import-from-archive --all or edamame import-from-archive --name testName to import all or some of their historical load test data. Please note that if archived load test data overlaps with load test data in the current cluster (e.g. same test name), then the import process will be aborted. As a result, it's recommended that edamame import-from-archive be executed prior to running any load tests in the new Edamame cluster. Also, please note that load tests stored in S3 with the GLACIER or DEEP_ARCHIVE classes or with the class INTELLIGENT_TIERING and that has an archive status of deep_archive_access or archive_access will need to be restored before they can be imported. See edamame restore for more details.
Terminal Output:
[02:29:28:602] ℹ Starting process to import AWS S3 archived data into Postgres database...
[02:29:31:507] ℹ Successfully imported the test 100kVUs from your AWS S3 Bucket.
[02:29:31:554] ✔ Completed importing data from AWS S3.
edamame restore
If a user wants to import load test data that's currently stored in S3 with the class DEEP_ARCHIVE, GLACIER, or INTELLIGENT_TIERING (and has an archive_access or deep_archive_access related archive status), a user must first restore the S3 object. This can be done by executing edamame restore --name testName --days 10. The number of days flag is required only if the S3 object has the GLACIER or DEEP_ARCHIVE storage class and should be an integer between 1 and 30. The S3 object will subsequently be restored to the STANDARD class for the specified number of days. During the restoration period, the user can subsequently import the load test data into their current Edamame cluster. If the S3 object has the INTELLIGENT_TIERING class, then the object will be restored to the Frequent Access tier after executing edamame restore --name testName (number of days flag is ignored in this case). Note that restoration isn't immediate and is a process completed by AWS. As a result, a user cannot immediately execute edamame import-from-archive after executing edamame restore.
Terminal Output:
[02:25:18:043] ℹ Starting restoration of AWS S3 object...
[02:25:19:060] ✔ AWS S3 restoration process is in progress. Once it's complete you can import data associated with testName into your current Edamame EKS cluster or move the S3 object elsewhere.
edamame teardown
If a user no longer wants or needs to run load tests and has no desire to retain any existing load test data, they can delete all existing load test data and AWS infrastructure by executing the command edamame teardown.
WARNING: This action is permanent. All load test data will be deleted. To run a subsequent load test, a user will have to provision and configure new AWS infrastructure by executing
edamame init.
Terminal Output:
[05:53:20:170] ℹ Tearing Down Edamame Cluster...
[05:53:20:548] ✔ Deleted Edamame Cluster
React UI
Establish Access
If a user prefers to work in a web application user interface rather than a command line interface, they can initialize a React UI by executing the command edamame dashboard --start after they have successfully finished executing the command edamame init. This command will also configure secure local access to the Grafana dashboard.
Terminal Output:
$ edamame dashboard --start
[12:00:32:022] ℹ Configuring local access to grafana dashboard...
[12:01:02:671] ✔ Please find your Grafana dashboard at: http://localhost:3000
[12:00:32:022] ℹ Initializing your dashboard
[12:01:02:671] ℹ Installed packages for your backend
[12:00:32:022] ℹ Installed packages for your frontend
[12:00:32:022] ℹ Generated frontend build
[12:01:02:671] ✔ Your dashboard is now running at http://localhost:3001
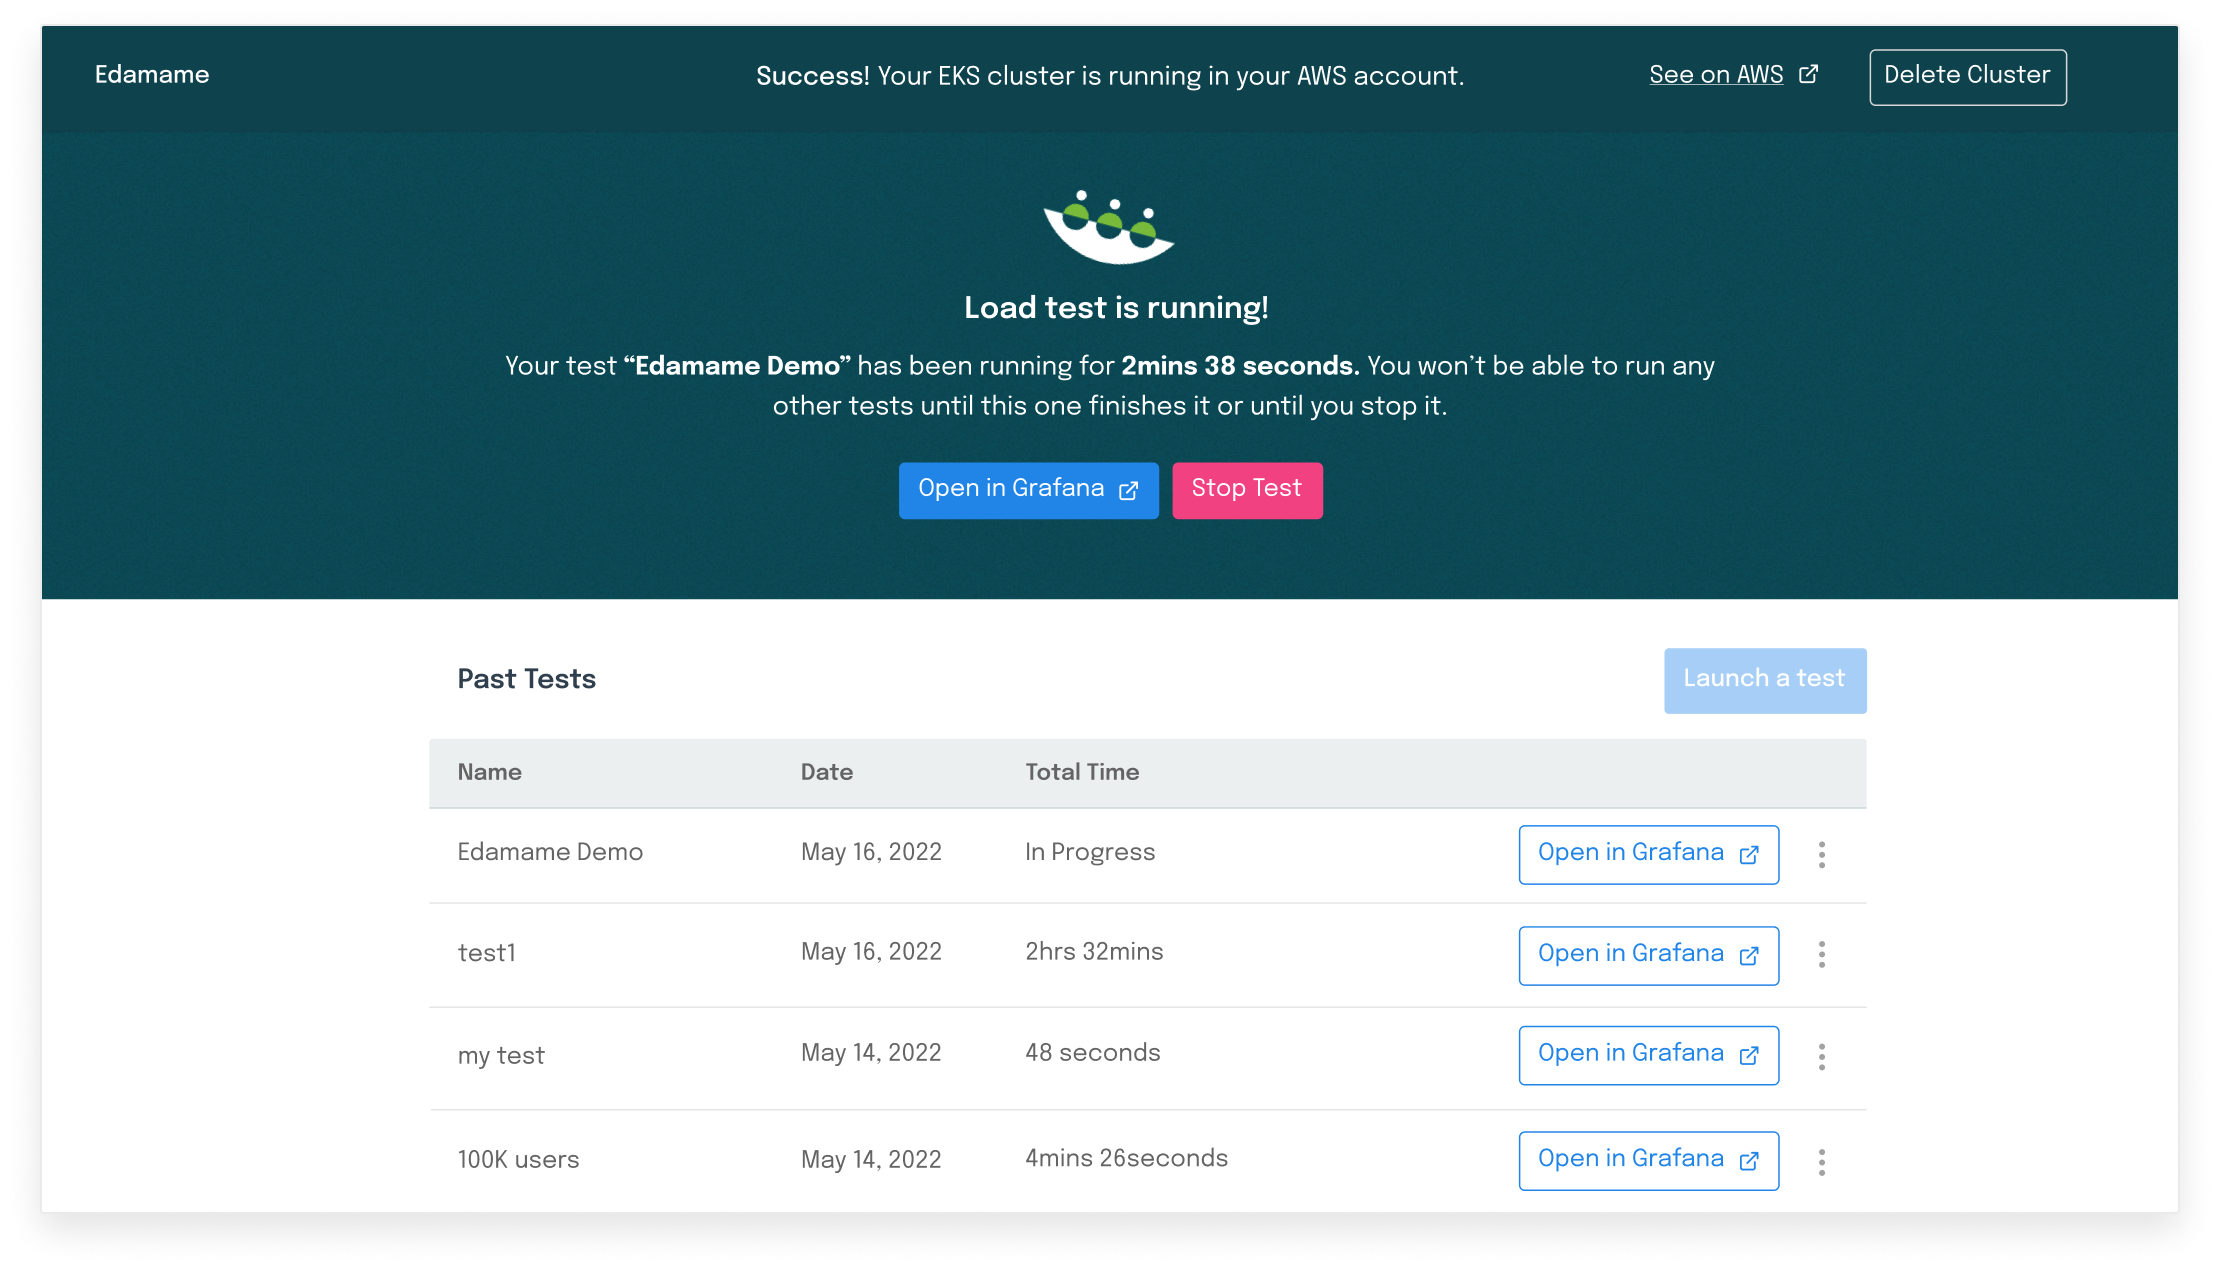
From within the React UI, a user can upload a k6 test script, start a load test, view and delete information about existing load tests, access Grafana to visualize load test metrics, and delete all existing AWS infrastructure and data.
Terminate Access
Once a user has finished using the React UI, they can end the local access to both the React UI and the Grafana dashboard by executing the command edamame dashboard --stop. This command will free up ports 3000 and 3001 for other processes.
Terminal Output:
$ edamame dashboard --stop
[02:17:24:140] ℹ Stopping dashboard
[02:17:24:520] ✔ Dashboard has been removed